







For a Linux-based Raspberry Pi, the most practical starting point is a 7-inch HDMI TFT LCD with touch support. For an Arduino, Raspberry Pi Pico, ESP32, or STM32 project, a 2.4- to 3.5-inch SPI TFT with an integrated display controller is usually the safer choice.
These recommendations are different because a Raspberry Pi computer and a microcontroller handle graphics in fundamentally different ways. A Raspberry Pi can generate a standard HDMI desktop or use a supported MIPI DSI display. A microcontroller usually has much less RAM and graphics bandwidth, so the display interface, controller IC, and framebuffer strategy become more important than screen size alone.
Quick LCD Display Recommendations
| Project platform | Recommended LCD module | Preferred interface | Typical application |
|---|---|---|---|
| Raspberry Pi 4, Pi 5 or Pi Zero | 5- to 7-inch IPS TFT, 1024 × 600 or higher | HDMI with USB touch | Dashboard, kiosk, media interface, smart home panel |
| Raspberry Pi with a tightly integrated enclosure | Supported 5- to 7-inch touch LCD | MIPI DSI | Tablet-style device, compact HMI |
| Arduino, Raspberry Pi Pico or small MCU | 2.4- to 2.8-inch, 240 × 320 TFT with display controller | SPI | Sensor display, portable instrument, simple control interface |
| ESP32 or STM32 handheld device | 2.8- to 3.5-inch TFT | SPI or 8080 parallel | IoT terminal, data logger, embedded GUI |
| High-performance MCU HMI | 4.3-inch or larger TFT with external memory support | RGB parallel | Industrial controller, appliance interface |
| Custom commercial product | Raw TFT panel, touch panel and matched controller board | HDMI, RGB, MIPI, LVDS or eDP | Production equipment and custom enclosures |
Raspberry Pi and Raspberry Pi Pico Need Different Displays
The Raspberry Pi name covers two distinct hardware categories.
Raspberry Pi 4, Raspberry Pi 5, Compute Modules and most Raspberry Pi Zero models are Linux computers with graphics hardware and standard video outputs. Current Raspberry Pi computers provide HDMI output, while many models also include a MIPI DSI connector for an embedded display. HDMI therefore provides a straightforward path for running Raspberry Pi OS, Chromium dashboards, media interfaces and other desktop applications. The available video connectors for different models are documented in the official Raspberry Pi display connection guide.
Raspberry Pi Pico is a microcontroller board. It does not run Linux and does not produce a normal HDMI desktop. The official Raspberry Pi Pico documentation describes Pico as an RP2040- or RP2350-based microcontroller programmed with MicroPython, C or C++. Its display requirements are much closer to an Arduino or embedded STM32 system.
Treating Pico as a smaller Raspberry Pi computer often leads to the wrong screen choice. A Raspberry Pi HDMI display and a Pico SPI display may both be called “Raspberry Pi LCD modules,” although their electrical interfaces and software architectures are unrelated.
Best LCD Display Module for Raspberry Pi
For a Raspberry Pi dashboard, kiosk or control panel, the strongest general recommendation is a 7-inch IPS TFT LCD with:
-
HDMI video input
-
1024 × 600 or higher resolution
-
Capacitive multi-touch
-
A USB touch interface
-
A matched controller board
-
Suitable mounting holes and accessible connectors
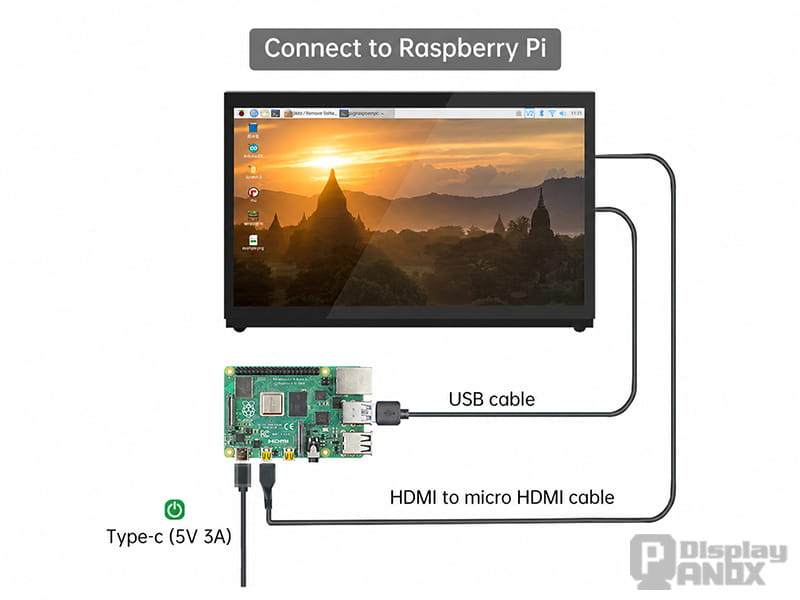
This configuration lets Raspberry Pi OS treat the module as a conventional monitor. The controller board converts the HDMI signal into the RGB, MIPI, LVDS or eDP format used by the actual TFT panel. It also manages panel timing, initialization, backlight control and other panel-specific functions.
Recommended Panox Display Option for Raspberry Pi
The Panox Display 7-inch Raspberry Pi LCD touch display is a suitable starting point for indoor dashboards, control terminals and embedded Linux interfaces. Its listed configuration includes:
-
7-inch TFT LCD
-
1024 × 600 resolution
-
HDMI display input
-
60 Hz refresh rate
-
Multi-touch support
-
USB touch ports
-
Landscape orientation
A 1024 × 600 panel provides more practical working space than low-resolution GPIO screens while keeping the interface legible at normal viewing distances. HDMI also leaves the Raspberry Pi GPIO header available for sensors, relays, serial buses and other project hardware.
This type of complete LCD kit is especially useful during development because the panel and controller board have already been matched. A raw MIPI, RGB or LVDS panel may offer a thinner mechanical stack, but it requires additional hardware and panel-specific configuration.
When Is MIPI DSI Better for Raspberry Pi?
MIPI DSI is attractive when the enclosure must be thin and cable count must remain low. A supported DSI module can carry display and touch data through a compact ribbon cable.
The official Raspberry Pi Touch Display 2 demonstrates this architecture. Its display and touch data use the DSI connection, while power is supplied through the GPIO header. Raspberry Pi OS includes the corresponding drivers and device-tree support for the exact panel configurations. The current models and connection requirements are documented by Raspberry Pi.
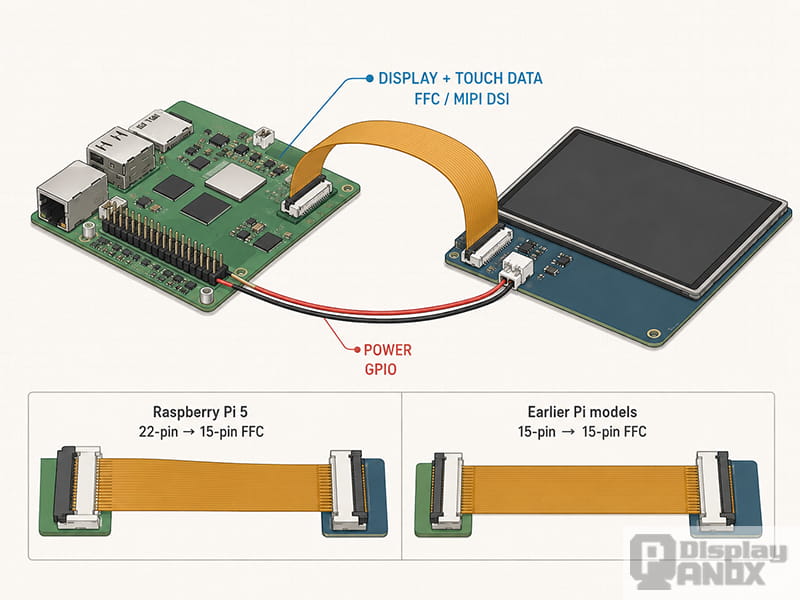
That software support is the important part. An arbitrary DSI panel cannot be treated as compatible simply because its FPC fits a DSI connector. Lane configuration, D-PHY timing, initialization commands, display mode, touch controller and Linux driver support must all match.
HDMI remains the safer choice when broad Raspberry Pi model compatibility and fast software setup are more important than minimum thickness.
Why Small SPI LCDs Are Usually Poor Raspberry Pi Desktop Displays
SPI displays remain useful on a Raspberry Pi when the screen only shows status data, temperatures, system load or a small secondary interface. They are less suitable for a full Linux desktop, browser dashboard or video interface.
A small SPI module transfers display commands and pixel data serially. Updating a large area therefore consumes considerably more bus time than sending the same desktop image through HDMI or DSI. The software stack may also require a framebuffer driver, DRM overlay or application-specific graphics library.
A 2.8-inch SPI TFT can be an excellent secondary instrument screen. It should not be selected as a direct replacement for a normal HDMI monitor unless the application has deliberately limited graphics requirements.
Best LCD Display Module for a Microcontroller
For an Arduino, Raspberry Pi Pico, ESP32 or compact STM32 system, a 2.4- to 2.8-inch 240 × 320 SPI TFT is the most balanced starting point.
A suitable module should include a known controller IC, internal display memory and a documented initialization sequence. Controllers such as the ILI9341 and ST7789 are widely supported by embedded graphics libraries, which reduces the amount of low-level driver work.
Recommended Panox Display Option for Microcontrollers
The Panox Display 2.8-inch ILI9341 TFT LCD is a useful reference module for handheld and embedded projects. The listed C0283QGL model combines:
-
240 × 320 resolution
-
ILI9341 display controller
-
SPI interface
-
Parallel interface
-
RGB interface option
-
Low-temperature operation down to −30°C
SPI is the practical option for a small controller with limited pins. A parallel or RGB connection can be considered when the selected MCU provides more GPIO, a dedicated LCD peripheral, sufficient memory and DMA support.
The availability of several interface modes also makes this type of panel useful during product development. An early prototype can begin with SPI, while a later hardware revision can move to a faster interface if the interface configuration and panel documentation support that route.
Understanding SPI Display Performance
A 240 × 320 image in RGB565 format contains:
240 × 320 × 2 bytes = 153,600 bytes
That equals 150 KiB for one full frame. Sending 30 complete frames per second requires approximately 36.9 Mbps of raw pixel data before command bytes, bus gaps and software overhead are included.
This does not mean every SPI display requires a 40 MHz or 80 MHz clock. There is no universal SPI frequency limit for TFT modules. The valid clock rate depends on the controller IC, panel circuit, MCU, voltage, cable length, PCB routing and datasheet timing requirements.
The exact wiring also varies. In addition to the SPI clock and data signals, a module may require chip select, data/command selection, reset, backlight control and separate touch-controller connections. Describing every TFT as a simple “four-wire display” can hide several signals that still consume GPIO pins.
For mostly static interfaces, partial updates are more important than chasing the highest possible bus clock. Only the pixels that have changed need to be transferred. Status bars, numerical values and small icons can therefore update smoothly even when a full-screen animation would remain inefficient.
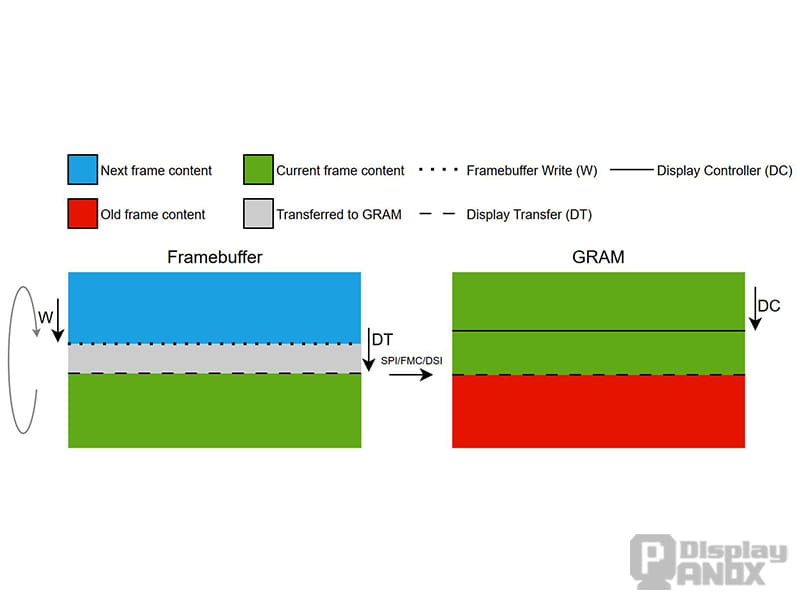
STMicroelectronics’ entry-level graphics guidance uses small SPI displays with display memory and partial framebuffers as a practical architecture for low-cost MCUs. This approach reduces RAM requirements and avoids sending an unchanged full screen during every update.
When Should an MCU Project Use RGB or Parallel LCD?
SPI is convenient, but it is not the best interface for every embedded GUI.
An 8080-style parallel interface transfers multiple data bits at once and can update an LCD controller more quickly than a serial connection. It requires more GPIO pins and more complicated PCB routing, but it works well for responsive mid-size touch interfaces.
RGB panels operate differently. The host continuously supplies pixel data together with a pixel clock and synchronization signals. These panels are suitable for larger or more dynamic interfaces, but they place greater demands on RAM bandwidth, DMA and display timing.
The Espressif LCD programming documentation separates LCD communication into a control plane and a pixel-data plane and supports SPI, 8080 parallel, RGB and MIPI DSI architectures across compatible processors. Its RGB LCD documentation also shows why framebuffer placement matters: storing a framebuffer in external PSRAM saves internal memory, although the LCD DMA engine and processor must then share available memory bandwidth.
For this reason, a 4.3-inch RGB display can be a sensible choice for a capable ESP32 or STM32 platform with external RAM. A basic Arduino Uno is better matched to a small SPI TFT or character LCD.
LCD Interface Comparison
| Interface | Main advantage | Main limitation | Best use |
|---|---|---|---|
| SPI | Low pin count and broad MCU support | Limited full-screen update bandwidth | Small MCU displays |
| 8080 parallel | Faster burst transfers | Uses more GPIO pins | Responsive embedded HMI |
| RGB parallel | Suitable for continuous graphics | Requires framebuffer bandwidth and accurate timing | Larger MCU interfaces |
| HDMI | Standard video output and easy Linux integration | Requires a display controller board for most raw panels | Raspberry Pi dashboards and kiosks |
| MIPI DSI | Compact, high-speed embedded connection | Requires compatible host hardware, initialization and drivers | Thin integrated products |
| LVDS or eDP | Efficient connection for many larger raw panels | Rarely connects directly to hobby boards | Industrial panels with a bridge board |
Five Checks Before Selecting an LCD Module
1. Confirm the Controller IC and Software Driver
The panel resolution alone does not establish compatibility. The display controller, initialization sequence, color order, scan direction and supported pixel formats must match the software driver.
A familiar controller can shorten prototype development, although the exact controller revision and module configuration still need to be verified. Two modules advertised under the same controller name may use different initialization values or pin assignments.
2. Calculate Memory and Transfer Requirements
The required framebuffer size can be estimated with:
Resolution × bytes per pixel × number of framebuffers
A full RGB565 framebuffer for a 1024 × 600 display requires approximately 1.17 MiB. Double buffering requires twice that amount before graphics assets and application memory are counted.
A Linux-based Raspberry Pi handles this workload comfortably. Many microcontrollers require external RAM, partial framebuffers or display-side GRAM.
3. Separate Logic Power from Backlight Power
The LCD logic supply, touch controller and LED backlight may use different voltages. A small module can sometimes be powered from a development board, while a larger backlight may need a separate regulated supply.
The backlight current should never be estimated from screen size alone. The panel datasheet and controller-board schematic remain the proper references.
4. Check the Touch Interface Separately
Touch data does not necessarily use the video interface. HDMI touch displays commonly use USB for touch input. Embedded capacitive touch controllers often use I²C, while resistive touch panels may use an SPI controller or analogue sensing circuit.
The touch-controller driver, coordinate rotation and display orientation should be verified together.
5. Consider the Finished Product
A development module may work electrically and still be unsuitable for production. Connector direction, FPC position, active area, cover-glass outline, mounting structure, brightness, operating temperature and long-term availability all affect the final design.
Outdoor and industrial projects may also require higher luminance, optical bonding, anti-glare treatment or a wider operating-temperature range.
How Panox Display Supports Raspberry Pi and MCU Projects
Panox Display can supply the LCD panel, touch sensor, cover glass, FPC, cable set and controller board as a matched display system. This is more useful for commercial products than selecting each component independently and discovering integration problems after the enclosure and PCB have already been designed.
For Raspberry Pi systems, Panox Display’s custom LCD controller boards include conversion routes such as:
-
HDMI to MIPI
-
HDMI to RGB
-
HDMI to LVDS
-
HDMI to eDP
-
Type-C to MIPI
-
Type-C to LVDS
The controller-board dimensions, connector locations, backlight control, touch interface, audio functions and firmware can be adapted to the selected display and enclosure.
For microcontroller products, Panox Display can help match the panel interface with the host processor, including SPI, 8080 parallel, RGB and MIPI options. Touch integration, cover-glass printing, optical bonding and mechanical customization can then be developed around the same display specification.
This approach creates a smoother path from a Raspberry Pi or MCU prototype to a repeatable production design.
Final Recommendation
A 7-inch 1024 × 600 HDMI touch LCD is the best general recommendation for a Raspberry Pi dashboard, kiosk or control terminal. It provides enough resolution for a Linux graphical interface, works through a standard video path and avoids consuming GPIO pins for pixel transfer.
A 2.8-inch 240 × 320 SPI TFT with an ILI9341-class controller is the better default for Arduino, Raspberry Pi Pico, ESP32 and small STM32 projects. It keeps wiring manageable, has mature software support and can operate without the memory architecture required by a large RGB panel.
Projects requiring a larger MCU interface should move to 8080 parallel or RGB only after framebuffer memory, pixel bandwidth and DMA support have been confirmed. Commercial products with custom dimensions, touch glass or unusual native interfaces benefit from a panel and controller board developed as one system.
Learn more: Can You Recommend Reliable TFT Display Suppliers for Arduino and Raspberry Pi Projects?
Frequently Asked Questions
Can the same LCD module work with both Raspberry Pi and Arduino?
Some SPI TFT modules can operate with both platforms when compatible software drivers are available. A large HDMI, MIPI, LVDS or eDP panel normally requires different controller hardware for a Raspberry Pi and an Arduino-class MCU.
Is HDMI or SPI better for a Raspberry Pi display?
HDMI is better for a full Raspberry Pi OS desktop, browser interface, video display or large touchscreen. SPI remains useful for compact status screens and secondary displays with limited update areas.
What is the best LCD size for a microcontroller?
A 2.4- to 3.5-inch display offers a practical balance between readability, pixel count, memory use and transfer speed. Larger panels can work with higher-performance MCUs, external RAM and a parallel display interface.
Can a raw MIPI LCD connect directly to Raspberry Pi?
Only when the exact panel, electrical configuration, DSI timing, initialization sequence and Linux driver are supported. A custom HDMI-to-MIPI controller board is often the more predictable route for an unsupported raw panel.
Does an LCD touchscreen use the same connection as the display?
Not always. HDMI modules commonly use USB for touch. Embedded capacitive touch panels often use I²C, while the LCD may use SPI, RGB or MIPI DSI. Both interfaces must be checked separately.