







For a Raspberry Pi computer, the most useful recommendation is not one fixed screen size or one “Raspberry Pi compatible” model. Almost any well-documented TFT LCD panel can be connected to a Raspberry Pi when it is paired with the correct controller board. The panel can use MIPI DSI, RGB, LVDS or eDP internally; a matched board converts the Raspberry Pi’s HDMI output into the signal, timing and power arrangement required by that particular display.
This changes the selection process. Screen size, resolution, brightness, viewing angle, touch structure, operating temperature and mechanical dimensions can be chosen first. Interface conversion is then handled by the display controller board.
Microcontroller projects require a different approach. An Arduino, Raspberry Pi Pico, ESP32 or STM32 does not normally produce a desktop HDMI signal, and its graphics performance depends on the available RAM, display peripheral and pixel-transfer bandwidth. Small SPI or 8080-interface modules are therefore convenient for many MCU designs, while larger RGB or MIPI displays require a more capable processor, external memory or a dedicated graphics controller.
| Project platform | Practical display path | Main reason |
|---|---|---|
| Raspberry Pi 4, Pi 5 or Pi Zero | Selected LCD panel plus a matched HDMI controller board | Broad panel choice and straightforward Raspberry Pi OS support |
| Compact Raspberry Pi product | Supported DSI display or raw LCD with a compact custom controller board | Thin construction and fewer external cables |
| Arduino, Raspberry Pi Pico or small MCU | SPI or 8080 TFT module with an integrated display controller | Low pin count and display-side graphics memory |
| ESP32 or STM32 HMI | SPI, 8080, RGB or supported MIPI DSI display | Interface can be matched to the MCU’s memory and display peripherals |
| Commercial embedded product | Panel, touch, cover glass, FPC and controller board developed as one system | Better mechanical fit and repeatable production |
Can Any LCD Be Connected to a Raspberry Pi?
In practical product development, almost any standard LCD can be used if three conditions are met:
-
The panel has a usable datasheet, pinout and initialization information.
-
A controller board can support its resolution, refresh rate and native interface.
-
The board firmware, cable, power rails and backlight circuit are configured for the exact panel.
The qualifier matters. A controller board is an active electronic system, not a passive FPC-to-HDMI cable. A raw LCD panel does not understand HDMI simply because the wires can be physically connected. The controller board must receive the HDMI video stream, present a suitable display mode to Raspberry Pi OS and generate the panel-specific output.
Depending on the panel and board design, that work can include:
-
HDMI reception and display-mode reporting
-
Conversion to MIPI DSI, RGB, LVDS or eDP
-
Pixel-clock and synchronization generation
-
MIPI lane configuration or LVDS/eDP link configuration
-
Panel initialization commands
-
Logic-voltage and backlight control
-
Touch-controller, audio or brightness-control connections
An undocumented salvaged panel with a proprietary interface may be impractical to support. A documented LCD with known electrical and timing requirements is usually a realistic candidate. The accurate answer is therefore “almost any documented LCD with a matched controller solution,” rather than “every panel through one universal adapter.”
A Raspberry Pi LCD Is Usually a Display System, Not a Special Type of Panel
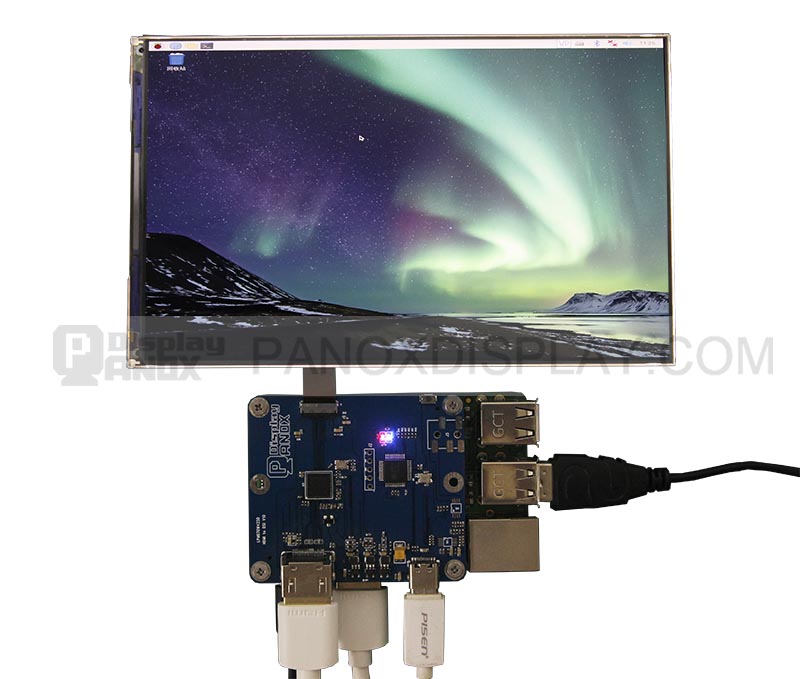
A 7-inch MIPI LCD connected to Raspberry Pi through a matched HDMI controller board.
Product listings often use the phrase “Raspberry Pi LCD display,” but the LCD itself may be a normal tablet, industrial or embedded panel. Compatibility comes from the complete signal path.
Linux-based Raspberry Pi computers provide HDMI output, while many full-size models also provide a MIPI DSI display connector. The available connectors vary by model, as shown in the official Raspberry Pi hardware documentation. HDMI is the more flexible route for a custom panel because it creates a standard boundary between the computer and the display electronics.
With a correctly configured board, Raspberry Pi OS sees the assembly as an HDMI display. The controller board handles the panel-specific interface on the other side. Raspberry Pi documentation also explains that HDMI display modes are normally selected from the display’s EDID information, which is one reason correct controller-board firmware matters.
| LCD panel interface | Typical Raspberry Pi connection | Suitable display types |
|---|---|---|
| HDMI input module | Direct HDMI video; USB is often used for touch | Development screens, kiosks and dashboards |
| MIPI DSI raw panel | HDMI-to-MIPI controller board | High-resolution tablet, mobile and compact embedded LCDs |
| LVDS raw panel | HDMI-to-LVDS controller board | Industrial, monitor and larger embedded LCDs |
| eDP raw panel | HDMI-to-eDP controller board | High-resolution tablet and notebook-class panels |
| RGB raw panel | HDMI-to-RGB controller board | Embedded TFT LCDs and custom HMI panels |
| Supported Raspberry Pi DSI module | Direct DSI FFC connection | Thin integrated displays with known Linux support |
| SPI display module | GPIO SPI connection | Small status displays with limited update areas |
Panox Display’s LCD range illustrates why the controller-board approach is useful. A 7-inch 1200 × 1920 MIPI LCD, a 7-inch 800 × 480 RGB LCD, an 8-inch 1024 × 768 LVDS LCD and a 9.7-inch 2048 × 1536 eDP LCD appear incompatible when only their FPC interfaces are compared. Each can become a Raspberry Pi display when paired with a board designed for its native interface, timing, voltage and backlight.
The panel no longer has to be selected from a narrow group carrying a Raspberry Pi label. Portrait screens, long-strip displays, square panels, high-PPI tablet LCDs and industrial modules can all be considered at the beginning of a project.
Which LCD Is Best for a Raspberry Pi Project?
The best LCD display for Raspberry Pi is the one that fits the finished device. A 7-inch HDMI touchscreen remains a sensible default for a dashboard or kiosk, but it is only a default—not a compatibility limit.
| Application | Recommended LCD characteristics | Connection approach |
|---|---|---|
| Home dashboard or control panel | 5- to 10.1-inch IPS, 1024 × 600 or higher, capacitive touch | HDMI controller board plus USB touch |
| Industrial HMI | High brightness, wide viewing angle, suitable operating temperature and long-term availability | HDMI-to-LVDS, HDMI-to-eDP or HDMI-to-RGB board |
| Compact handheld or embedded terminal | Thin 4.3- to 7-inch panel, compact FPC and low-profile touch structure | Supported DSI or custom HDMI-to-MIPI board |
| High-resolution inspection or imaging interface | High-PPI MIPI or eDP LCD with accurate color and sufficient luminance | Matched HDMI controller board |
| Long-strip, square or portrait interface | Native resolution and active area matched to the enclosure | Custom board firmware and mechanical layout |
| Fast prototype | Complete LCD, controller board, cable and touch kit | HDMI video and USB touch |
For an early prototype, a ready-matched HDMI display kit reduces setup time. For a commercial product, starting with the final panel specification is usually more efficient. It prevents a temporary development screen from dictating the enclosure, aspect ratio or user-interface layout.
When Is Direct MIPI DSI Better?
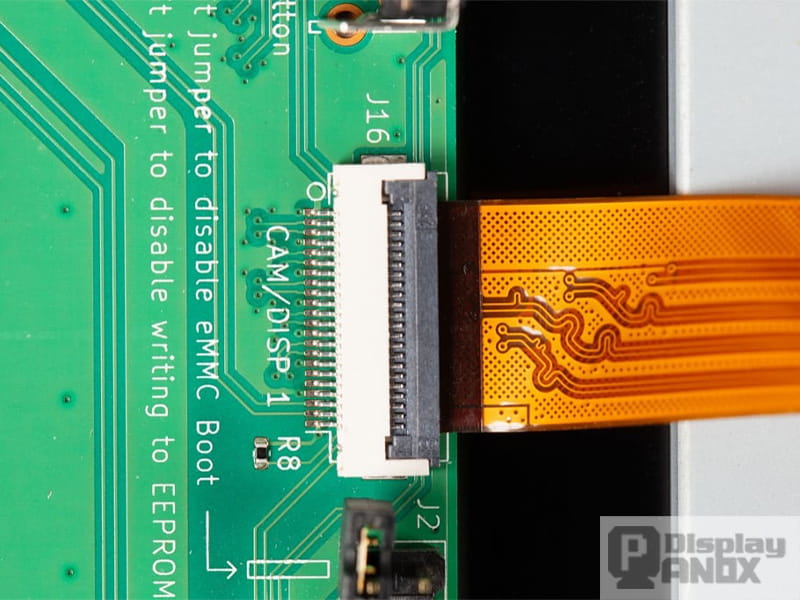
Touch Display 2 uses a DSI FFC for display and touch data, with a separate GPIO power connection.
A direct DSI connection can reduce cable size and board area. It is attractive for a thin enclosure, but DSI compatibility is panel-specific.
The official Raspberry Pi Touch Display 2 is a useful reference. Its DSI connection carries display and touch data, while a separate GPIO cable supplies power. Raspberry Pi 5 uses a different FFC arrangement from Raspberry Pi 4 and earlier models, as documented in the official Touch Display 2 connection guide.
Matching connector pitch is only the first step for a third-party raw DSI panel. Lane count, D-PHY timing, command sequence, video mode, pixel format, touch controller and Linux DRM panel driver must also be supported. A custom HDMI-to-MIPI board is often more predictable when the preferred panel does not already have a maintained Raspberry Pi driver.
Direct DSI is therefore best when the exact display has proven operating-system support. HDMI conversion is better when freedom of panel choice and fast integration matter more.
What Changes for a Microcontroller Project?
Raspberry Pi Pico belongs in the microcontroller category. It does not run Raspberry Pi OS or provide the conventional HDMI desktop available from Raspberry Pi computers. Its display requirements are closer to those of an Arduino, ESP32 or STM32 board.
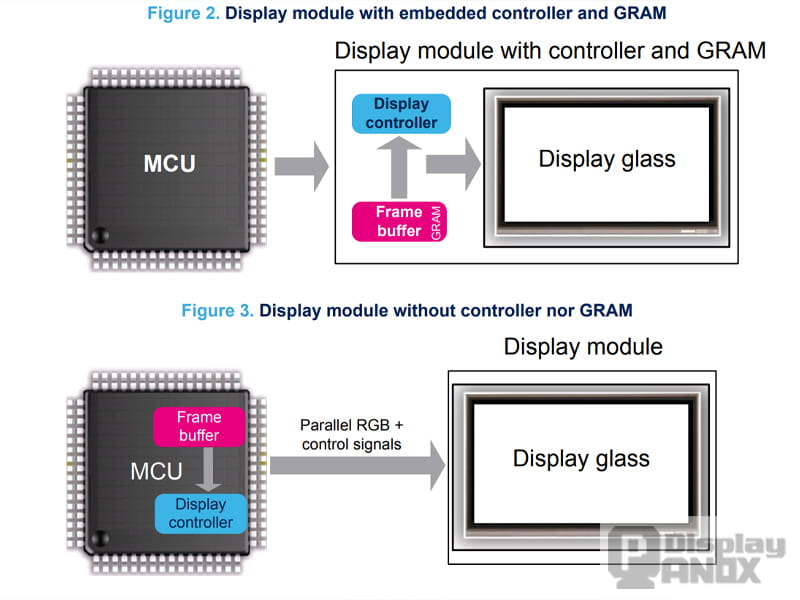
For a small MCU interface, an SPI or 8080 TFT module with an integrated controller and GRAM is a practical starting point. The microcontroller sends commands and changed pixel regions to the display controller, while the display stores the image locally. This architecture keeps host RAM requirements under control and works well for instruments, sensor readouts, compact menus and simple touch interfaces.
RGB panels work differently. The host normally maintains a framebuffer and continuously sends pixel data with a clock and synchronization signals. One 800 × 480 RGB565 framebuffer requires:
800 × 480 × 2 bytes = 768,000 bytes, or 750 KiB
Double buffering requires about 1.46 MiB before icons, fonts and application data are counted. The MCU must also sustain the required memory and pixel bandwidth. STMicroelectronics’ LTDC application note AN4861 separates displays with controller-side GRAM from RGB displays that depend on internal or external framebuffer memory, and it stresses that memory bandwidth must support the required pixel stream.
Espressif’s official LCD programming guide likewise distinguishes SPI, I2C, 8080 parallel, RGB and MIPI DSI paths. Interface support depends on the selected ESP chip rather than the ESP32 name alone.
Practical MCU Recommendations
| MCU project | Recommended display | Points to verify |
|---|---|---|
| Basic Arduino or RP2040 instrument | 1.8- to 3.5-inch SPI TFT with controller GRAM | Logic voltage, SPI timing, library and pin use |
| ESP32 touchscreen UI | SPI/QSPI or 8080 TFT; RGB on supported chips | DMA, PSRAM, touch driver and refresh target |
| STM32 control panel | SPI/8080 for modest graphics; RGB through LTDC for richer UI | Internal/external RAM, pixel clock and memory bandwidth |
| High-performance MCU HMI | RGB or supported MIPI DSI panel | Display peripheral, external memory, PCB layout and initialization |
| Large high-resolution screen | External graphics controller or a Linux-capable Raspberry Pi/SoC | Full system bandwidth and software architecture |
Screen size alone should not decide the MCU interface. A mostly static 4.3-inch status display may work well over SPI, while an animated 3.5-inch GUI can expose the limits of the same bus. Resolution, changed pixel area and target frame rate are more useful measures.
Five Specifications That Must Match the Controller Board
1. Native Interface and Pinout
MIPI DSI, LVDS, eDP and RGB describe interface families, not universal connectors. Lane count, channel mapping, bit depth, FPC orientation and pin assignment must match the panel datasheet.
2. Resolution, Timing and Refresh Rate
The active resolution is only part of the video mode. Pixel clock, blanking intervals, synchronization polarity and refresh rate also matter. Unusual portrait and long-strip resolutions often need panel-specific firmware and EDID data.
3. Power and Backlight
LCD logic, source/gate driving, touch electronics and LED backlight may require different voltages. Larger or high-brightness backlights often need a dedicated constant-current driver rather than power taken directly from a Raspberry Pi header.
4. Touch Interface
HDMI normally carries video and audio, not touch coordinates. Raspberry Pi touch displays commonly return touch data over USB. Embedded capacitive touch controllers often use I2C, while resistive touch may use SPI or analogue sensing. Display rotation and touch-coordinate rotation must be configured together.
5. Mechanical Integration
Board outline, mounting holes, connector direction, cable bend radius, FPC position and cover-glass dimensions can determine whether an electrically correct display fits the enclosure. These details should be defined before a controller board is finalized.
How Panox Display Supports Raspberry Pi and MCU Display Projects
Panox Display recommends selecting the LCD around the product rather than forcing every design onto one standard development screen. The company can supply a matched set that includes the LCD panel, touch panel, cover glass, FPC, connectors, cables and controller electronics.
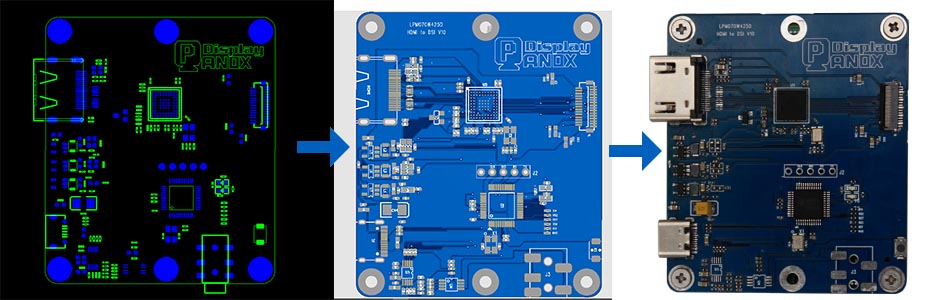
A custom LCD controller board progressing from layout design to assembled hardware.
For Raspberry Pi projects, Panox Display’s custom LCD controller boards cover HDMI-to-MIPI, HDMI-to-RGB, HDMI-to-LVDS and HDMI-to-eDP conversion, as well as Type-C display solutions. Board dimensions, connector positions, firmware, backlight control, touch connections and optional functions can be adapted to the selected panel and enclosure.
For microcontroller products, the same display selection can be evaluated for SPI, 8080 parallel, RGB or MIPI operation according to the host processor. Panox Display can also support touch integration, cover-glass printing, optical bonding and FPC customization, keeping the prototype and production display architecture aligned.
A useful display request includes the host-board model, target screen size, required resolution, orientation, brightness, touch type, operating temperature, available power and enclosure limits. If a panel has already been selected, its exact model number and datasheet should be included. These details allow the LCD and controller board to be matched as one system.
Final Recommendation
For a Linux-based Raspberry Pi, almost any documented LCD panel can be a valid choice when a suitable controller board is available. The panel should be selected for the product’s visual, environmental and mechanical requirements; HDMI-to-MIPI, HDMI-to-LVDS, HDMI-to-eDP or HDMI-to-RGB conversion can solve the interface difference.
When no product requirements have been defined, a 7-inch IPS LCD with 1024 × 600 or 1280 × 800 resolution, an HDMI controller board and USB capacitive touch remains an easy prototype option. It is recommended because it is convenient and widely supported, not because Raspberry Pi is limited to that format.
For a microcontroller, an SPI or 8080 display with an integrated controller is the safer default for a compact interface. RGB or MIPI panels become practical when the chosen MCU, external memory and graphics architecture can meet their framebuffer and bandwidth requirements.
The final choice is therefore not “Which LCD is compatible?” but “Which LCD best fits the product, and what controller path will make it compatible?”
Frequently Asked Questions
Can a tablet or laptop LCD be used with Raspberry Pi?
Yes, in many cases. Tablet panels commonly use MIPI DSI or eDP, while laptop and industrial panels may use eDP or LVDS. The exact model needs a compatible HDMI controller board, cable, firmware, power circuit and backlight driver.
Can a raw MIPI LCD connect directly to the Raspberry Pi DSI port?
Only when the panel’s electrical configuration, DSI mode, initialization sequence and Linux driver are supported. A matching FPC connector does not prove compatibility. An HDMI-to-MIPI controller board is often the more reliable path for an unsupported panel.
Is an adapter board enough for every LCD?
The board must be designed or configured for the exact panel. A generic connector adapter cannot translate video protocols or generate panel timing. A proper controller solution includes compatible hardware, firmware, cable mapping and power design.
Can the same LCD work with both a Raspberry Pi and a microcontroller?
Yes, provided that each host has a suitable interface path. A raw RGB or MIPI panel may use an HDMI controller board with Raspberry Pi and a native RGB/MIPI peripheral with a capable MCU. The two systems may require different boards, firmware and memory architectures.
Does HDMI Also Carry Touchscreen Data?
Usually not. HDMI carries the display signal, while touch data is commonly returned to the Raspberry Pi through USB. An embedded touch controller may instead use I2C or SPI.
Is HDMI or DSI Better for Raspberry Pi?
HDMI offers broader panel choice and easier software integration through a matched controller board. Direct DSI can produce a thinner, more compact assembly when the exact panel and driver are supported. The better option depends on enclosure space, software support and production requirements.